Introduction
Today’s focus was on debugging WordPress effectively and understanding the core parts of WordPress development that every support engineer must know.
I began by learning how to turn on debugging safely using constants in wp-config.php, and then explored three powerful helper plugins, Query Monitor, WP Crontrol, and User Switching to track performance issues, manage cron events, and reproduce user-specific bugs.
After mastering debugging, I moved into core WordPress development:
- creating a small plugin,
- basic concept of creating plugins
- custom post types
- custom taxonomies
- wp_query
This day tied everything together showing how WordPress works under the hood, and how to quickly troubleshoot, extend, and optimize any site with professional-level tools.
01. Defining Debugging Constants in WordPress
When working as a support engineer or developer, debugging is your best friend — but it should always be enabled safely. WordPress allows you to control what errors appear and where they’re stored using a few simple constants inside wp-config.php.
Add the following lines above the comment /* That's all, stop editing! Happy publishing. */:
define( 'WP_DISABLE_FATAL_ERROR_HANDLER', true ); // WP 5.2 +: show real fatal errors while developing

define( 'WP_DEBUG', true ); // turn on WordPress debug mode

define( 'WP_DEBUG_DISPLAY', false ); // hide errors from the browser

define( 'WP_DEBUG_LOG', true ); // log all errors to /wp-content/debug.log

define( 'SCRIPT_DEBUG', true ); // load unminified core CSS and JS files
What Each Constant Does
| Constant | Purpose |
|---|---|
| WP_DISABLE_FATAL_ERROR_HANDLER | Disables WordPress’ built-in “white screen protection,” so you can view actual fatal errors while developing. (Only use this on local or staging environments.) |
| WP_DEBUG | Enables all PHP notices, warnings, and errors for WordPress and plugins. |
| WP_DEBUG_DISPLAY | Hides errors from the frontend or admin area to avoid breaking layouts. |
| WP_DEBUG_LOG | Saves all errors to /wp-content/debug.log, which can be opened in any text editor. |
| SCRIPT_DEBUG | Forces WordPress to use non-minified core files, making it easier to trace JS and CSS issues. |
Where to View the Log
Open the file:
example.com/wp-content/debug.log
You can also use a plugin such as Log Viewer or Error Log Monitor to read this log directly from the dashboard.
⚠️ Safety Notes
- These settings are for development only.
- On live sites, set
WP_DEBUGandSCRIPT_DEBUGtofalse, and remove the fatal-error-handler line. - Clear or rotate the
debug.logregularly to prevent it from growing too large. - Combine this setup with plugins like Query Monitor or WP Crontrol for a complete debugging workflow.
02. Helper Plugins for Debugging in WordPress
There are certain WordPress plugins that make it much easier to debug PHP errors, actions, filters, enqueued scripts and stylesheets, and even HTTP requests.
In this section, we’ll go over three essential ones Query Monitor, WP Crontrol, and User Switching and see how each helps during development and troubleshooting.
| Plugin | Purpose | How I Used It |
|---|---|---|
| Query Monitor | Shows PHP errors, database queries, HTTP requests, hooks & actions, scripts, and performance bottlenecks. | Checked for slow database queries and heavy hooks on page load. |
| WP Crontrol | Lets you view and manage cron events and scheduled tasks. | Disabled duplicate or unnecessary cron jobs during testing. |
| User Switching | Quickly switch between users without logging out/in. | Reproduced role-specific bugs (Subscriber vs Admin) safely. |
Query Monitor
Query Monitor adds a complete developer tools panel inside WordPress.
It lets you inspect almost everything happening behind the scenes:
- Database queries (with execution time and source)
- PHP errors and notices
- Hooks and actions currently running
- Enqueued scripts and styles
- REST API and Ajax calls
- HTTP API requests and responses
- Block Editor blocks and capability checks
The plugin automatically adds a toolbar entry in the WordPress admin bar; click it to open detailed tabs for each section.
Why it’s useful
Query Monitor instantly shows slow database queries or heavy hooks, helping identify performance bottlenecks. It’s a must-have in every development or staging site.
Here’s a brief introduction about the plugin and what information it displays and where:
You can learn more on the plugin’s page
💡 Idea to Explore → Using Query Monitor to Identify Performance Bottlenecks
If your WordPress site feels slow or inconsistent, Query Monitor can help you see what exactly is taking time:
- Activate the plugin, open any front-end page, and then open the admin bar → “Query Monitor.”
- Go to the Queries tab:
- Sort by Time to find the slowest SQL queries.
- Look for repeating queries or ones touching custom tables.
- Note the calling function (helps find which plugin/theme is responsible).
- Check Hooks & Actions → shows how many callbacks each hook has. Too many actions on
initorwp_headcan slow down loading. - HTTP Requests tab → see external API calls that may delay page rendering.
- Scripts & Styles tab → identify plugins enqueueing large CSS/JS files on every page.
- Summary panel → total queries, peak memory usage, PHP execution time.
Goal:
- Anything consistently over 0.05 seconds per query or memory use above 64 MB on simple pages is worth optimizing.
Example
“If a plugin is making 40 duplicate queries per page. Disabling it cut load time from 2.5 s to 1.3 s.”
WP Crontrol
WP Crontrol allows you to view, manage, and debug WordPress Cron events directly from the admin area.
From its interface you can:
- View all cron events with their hooks, arguments, recurrence, and next-run time
- Edit, delete, or immediately run any event
- Add custom cron events or custom schedules
- Bulk-delete unwanted events
- Export cron events to a CSV file
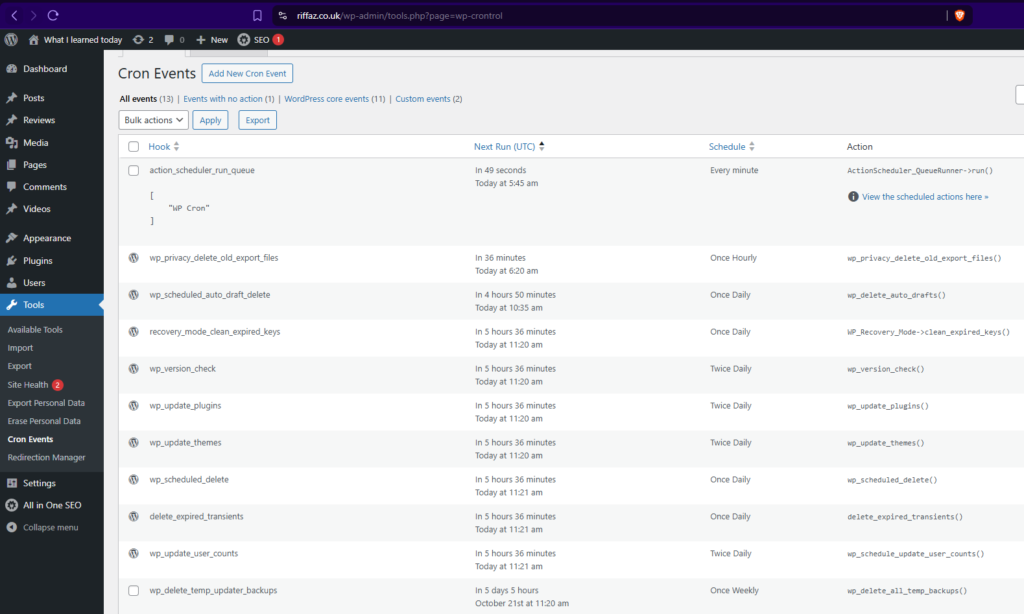
Why it‘s useful
This plugin helps verify whether scheduled tasks (like emails, imports, or backups) are running properly. A common cause of “nothing happens” issues in WordPress.
You can read more about WP Crontrol on its plugin page.
User Switching
User Switching lets you instantly swap between user accounts without logging out and back in.
Normally, testing as a specific user means resetting passwords and logging in manually; this plugin saves all that time.

Helpful when:
- An issue appears only for specific users or roles (e.g., “Subscriber can’t see button”)
- You need to test restricted content, membership, or checkout flows for different roles
Just click Switch To under any user in Users → All Users, and you’ll be logged in as them instantly. A single click restores your original admin session.
You can check more details on the User Switching plugin page.
I also went through (quickly) xDebug and JavaScript with Chrome DevTool for language specific debugging
After completing the debugging and helper plugins session, I took a short lunch break.
Once back, I moved on to the Basic Plugin Development module starting with how plugins are structured, how to register them properly, and how WordPress hooks (actions and filters) connect everything behind the scenes.
03. Basic Plugin Development – Quick Start
Before diving into the deeper APIs, I focused today on understanding how plugins are structured and how hooks connect everything inside WordPress.
I began with a quick hands-on experiment using an MU-plugin to understand how WordPress executes hooks, and then gradually explored how actions and filters form the core of every plugin.
Understanding Hooks with an MU-Plugin
Before building a regular plugin, I tested how WordPress triggers hooks internally by creating a small MU-plugin (Must-Use Plugin).
MU-plugins load automatically on every request, making them perfect for experiments and debugging.
Steps followed:
- Created a new folder:
wp-content/mu-plugins/ - Added a file:
wp-content/mu-plugins/hook-watcher.php
hook-watcher.php
<?php
/**
* Plugin Name: Hook Watcher (MU)
* Description: Logs every hook that fires — for learning purposes only.
*/
if ( ! defined( 'ABSPATH' ) ) exit;
// Extremely noisy — use only on local environment
add_action( 'all', function ( $hook ) {
error_log( $hook ); }
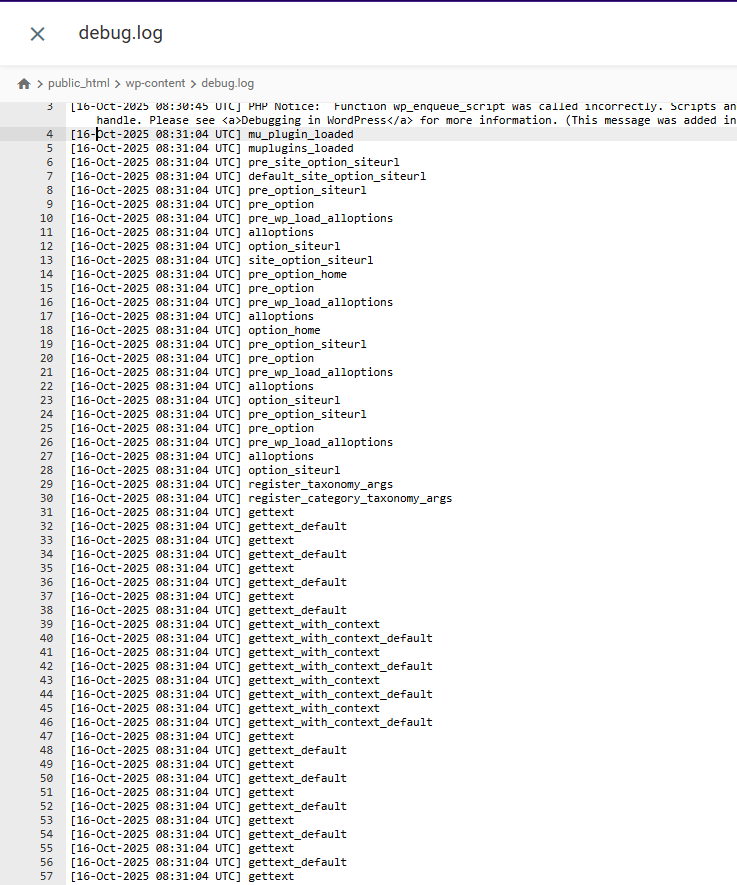
);With WP_DEBUG_LOG enabled, this script records every WordPress hook into /wp-content/debug.log.
What I Observed
Opening the log showed a long list of hook names like:
🧩 3. Hooks – Actions and Filters
Hooks are the backbone of WordPress extensibility. They allow plugins, themes, and even core to “talk” to each other.
| Type | What It Does | Example |
|---|---|---|
| Action Hook | Runs custom code at a specific point. | add_action( 'init', 'my_function' ); |
| Filter Hook | Modifies data before it’s displayed or saved. | add_filter( 'the_content', 'my_filter' ); |
🟢 Actions → “Do something.”
🟢 Filters → “Change something.”
Testing a Global Filter
To understand how powerful filters are, I tried adding this inside my MU-plugin:
add_filter( 'render_block', function( $block ){
  return '<img src="https://picsum.photos/' . rand(200,400) . '" />';
});
Effect:
This replaces every rendered block on the site with a random image from Picsum.
It clearly shows how a filter can intercept and modify the final output before display.
(And yes, remove this after testing 😄)
💡 Ideas to Explore
1️⃣ What is the purpose of add_action() and how is it implemented?add_action() attaches your custom function to a hook so it runs at a specific moment.
add_action( 'init', 'register_custom_post_type' );
Use when you want to run code (register a CPT, enqueue scripts, schedule tasks, etc.).
2️⃣ How does add_filter() work, and when would you use it?add_filter() modifies or formats data before it’s output or saved.
add_filter( 'the_title', 'prefix_modify_title' );
  function prefix_modify_title( $title ) {
  return '👉 ' . $title;
}
Use when you need to alter text, markup, or data dynamically.
3️⃣ What’s the difference between do_action() and apply_filters()?
| Function | Purpose | Example |
|---|---|---|
do_action() | Executes all callbacks added with add_action() | do_action( 'init' ); |
apply_filters() | Passes a value through all add_filter() callbacks and returns it | $title = apply_filters( 'the_title', $title ); |
add_action()↔do_action()= execute code.add_filter()↔apply_filters()= modify and return data.
4️⃣ How can you prioritize Actions or Filters?
Both accept a priority number (default is 10).
Lower numbers run earlier; higher numbers run later.
add_action( 'init', 'early_function', 5 );
add_action( 'init', 'late_function', 20 );
Use priority to control the order when multiple functions are attached to the same hook.
✅ Summary
- MU-plugins are great for quick experiments and debugging.
add_action()runs your code at a specific point.add_filter()modifies data before it appears.do_action()andapply_filters()are what actually fire those hooks.- Priority lets you decide the order of execution.
Together, these form the core foundation of how every WordPress plugin works.
04. Custom Post Types and Taxonomies – Quick Run
With limited time left in the day, I did a short but practical run on Custom Post Types (CPTs) and Custom Taxonomies. Two features that make WordPress flexible beyond posts and pages.
1. Custom Post Types
A Custom Post Type lets you create new types of content. For example, Books, Projects, or Reviews, each with its own editor and structure.
You register a CPT using the register_post_type() function, usually inside a plugin or in functions.php.
Example:
function create_books_cpt() {
    $labels = array(
        'name'          => 'Books',
        'singular_name' => 'Book',
        'add_new_item'  => 'Add New Book',
        'edit_item'     => 'Edit Book',
        'menu_name'     => 'Books',
    );

    $args = array(
        'public'        => true,
        'has_archive'   => true,
        'rewrite'       => array( 'slug' => 'books' ),
        'supports'      => array( 'title', 'editor', 'thumbnail', 'excerpt' ),
        'show_in_rest'  => true, // enables Gutenberg & REST API
        'labels'        => $labels,
        'menu_icon'     => 'dashicons-book-alt',
    );

    register_post_type( 'book', $args );
}
add_action( 'init', 'create_books_cpt' );
Key Arguments and Labels in register_post_type()
| Parameter | Purpose |
|---|---|
| labels | Defines all text displayed in the admin for this CPT (name, add new, edit, etc.). |
| public | Makes it visible on the frontend and admin menu. |
| has_archive | Creates an archive page like /books/. |
| rewrite | Defines custom URL slug for the CPT. |
| supports | Enables features like title, editor, thumbnail, etc. |
| show_in_rest | Enables block editor and REST API support. |
| menu_icon | Sets a custom icon in the dashboard menu. |
👉 In short: labels control the text users see; args control how the post type behaves.
2. Custom Taxonomies
A taxonomy groups related posts together. For example, genres for books or skills for projects.
WordPress includes two default taxonomies: Categories and Tags, but you can create your own.
Example:
function create_book_genre_taxonomy() {
    register_taxonomy(
        'genre',
        'book',
        array(
            'label'        => 'Genres',
            'rewrite'      => array( 'slug' => 'genre' ),
            'hierarchical' => true, // true = like categories, false = like tags
            'show_in_rest' => true,
        )
    );
}
add_action( 'init', 'create_book_genre_taxonomy' );
When to Create a Custom Taxonomy
Create a custom taxonomy when you need to organize or filter a custom post type beyond the default categories or tags.
Examples:
- Book Genres for “Books”
- Project Types for “Portfolio”
- Locations for “Events”
✅ Summary
- Custom Post Types let you add new content types (Books, Projects, etc.).
- Key arguments:
labels,public,supports,rewrite,show_in_rest,has_archive. - Custom Taxonomies group content within those post types.
- Use them when default categories/tags don’t fit your structure.
05. WP_Query – Custom Queries in WordPress
I also did a quick review of WP_Query, the main class that controls how WordPress retrieves posts from the database.
What is WP_Query?
WP_Query is the core query class that WordPress uses to fetch posts, pages, or custom post types based on specific conditions — for example, only posts from a certain category, author, or date range.
It gives developers complete control over which posts are displayed and in what order.
Example:
$query = new WP_Query( array(
    'post_type'      => 'book',
    'posts_per_page' => 5,
    'orderby'        => 'date',
    'order'          => 'DESC',
) );

if ( $query->have_posts() ) {
    while ( $query->have_posts() ) {
        $query->the_post();
        the_title( '<h3>', '</h3>' );
    }
    wp_reset_postdata();
}
How WP_Query Differs from get_posts() and query_posts()
| Function | Description | When to Use |
|---|---|---|
| WP_Query | The main, flexible class for custom queries. Returns a query object you can loop through safely. | Use in custom templates, plugins, or shortcodes. |
| get_posts() | A simplified wrapper for WP_Query that just returns an array of posts (not the full query object). | Use when you only need raw post data and won’t run a loop. |
| query_posts() | A deprecated approach that modifies the main query directly (can break pagination or global query). | Avoid using this. Prefer pre_get_posts or a custom WP_Query. |
✅ Summary
WP_Query= the main and most flexible query class in WordPress.get_posts()= lightweight shortcut, returns post arrays only.query_posts()= modifies the main query and should generally be avoided.
In short:
Use
WP_Querywhen you want full control,get_posts()when you just need data, and skipquery_posts()entirely.
And then I scrolled through (Core APIs):
- Metadata API
- Shortcode API
- Administration Menus
- Settings & Options API
If you are up to learn deep plugin development you can learn them from WordPress codex.
Then I created a plugin folder structure using the WordPress Plugin Boilerplate Generator which was suggested in the assignment section.
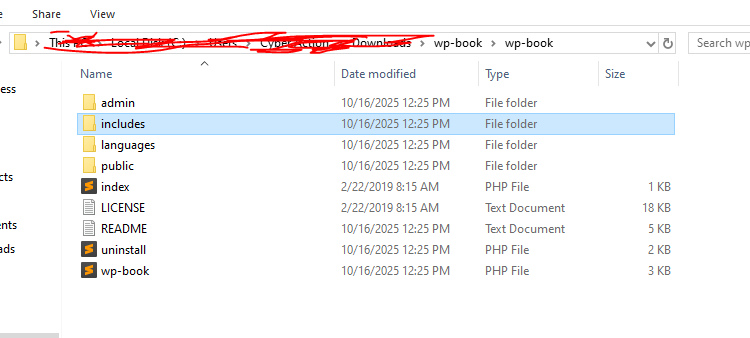
With that I completed the quiz as well.
🧭 What I Learned Today
Today everything started to click.
I began the morning by setting up proper debug constants in wp-config.php, and for the first time, errors were neatly written to debug.log instead of cluttering the screen.
Then came my first MU-plugin, a little “hook watcher” that logged every WordPress hook. Watching hundreds of hooks fire in sequence was fascinating and made me realise how many moving parts build a single page. (I quickly deleted it before the log exploded 😄.)
I also tried a few helper plugins:
Query Monitor for tracking slow queries, WP Crontrol for checking cron jobs, and User Switching to test different roles, all simple but powerful tools for real-world debugging.
After lunch, I experimented with actions and filters.
That’s when things really made sense, actions let me do something, while filters let me change something.
I even tried the render_block filter trick that replaced all blocks with random images funny, but eye-opening.
Some of these things I already knew. I learned a lot of this when I built my own plugin Clean Checkout for WooCommerce.
But this time, the structured approach in the training helped me connect all those pieces together and understand why things work the way they do.
To end the day, I quickly created a Custom Post Type (“Books”) with a Genre taxonomy, then explored WP_Query and how it differs from get_posts() and query_posts().
Now I finally understand how WordPress fetches, organizes, and displays content not just how to fix it.
Tomorrow’s plan: dive into Theme Development and the REST API basics to tie everything together.